Machine vision algorithms
Binarization algorithm
Grayscale is in the RGB (Red, Green, Blue) model. If R=G=B, the color represents a grayscale color, where the value of R=G=B is called the grayscale value. Therefore, each pixel in the grayscale image only needs one byte to store the grayscale value (also known as intensity value or brightness value), with a grayscale range of 0-255. The commonly used method is the weighted average method to obtain the grayscale value of each pixel. The binarization of an image is to set the grayscale value of the pixels on the image to 0 or 255, which presents the entire image with a clear visual effect of only black and white. In digital image processing, binary images play a very important role. The binarization of images greatly reduces the amount of data in the image, thereby highlighting the contour of the target [7]. In the process of automobile manufacturing, such as engine and gearbox coating photography inspection, steel stamping photography inspection, etc., binary algorithms are used for processing.
Defect detection algorithm
Using a camera to detect the intensity of an area is achieved by dividing the area into sections and comparing each section for detection. So as to detect the parts with large travel distances (determined by concentration differentiation). The brightness tool determines the presence or absence of features based on the average grayscale value. Suitable for situations where good component features are significantly darker or brighter than bad component features. By scanning the product in any direction such as X, Y, XY, radius, and circumference, the size, direction, comparison interval, and movement amount of the segment can be selected based on the detection object. Using colors to indicate the level of defects (dark blue → light blue → green → yellow → red), the range and distribution of defects can be confirmed in a two-dimensional form. The application cases in the automotive manufacturing process mainly determine the presence of inorganic machining holes based on brightness, installation parts for engines and transmissions, whether bolts are missing, and whether there are organic machining tool marks.
Deep Learning and Machine Vision
Deep learning is a field of machine learning that can train camera software and equip it with learning capabilities. Deep learning can be achieved through architectures such as artificial neural networks, which mimic the workings of the human brain by processing data and creating patterns for decision-making. Before the emergence of deep learning algorithms, visual algorithms could be roughly divided into five steps: feature perception, image preprocessing, feature extraction, feature screening, inference prediction, and recognition. The Cognex camera is based on a set of state-of-the-art machine learning algorithms that use deep learning as a supplement to traditional machine vision. The system is trained through samples to distinguish acceptable changes and defects, designed specifically for factory automation applications. It is currently a widely tested and optimized reliable software solution, and deep learning algorithms are also used in autonomous driving technology for automobiles.
Convolutional Neural Networks (CNN) and Machine Vision
Convolutional neural networks, also known as CNN, are often used in machine vision as a more accurate simulation of the human brain. In fact, in machine vision, convolution can be regarded as an abstract process, which abstracts the statistical information within a small domain. The operation of inner product between data from different data windows in an image and a convolution kernel (a filtering matrix) is called convolution. The calculation process is also known as filtering, and the essence of convolution is to extract features from different frequency bands of the image. If the depth of convolutional neural networks is too shallow, their recognition ability is often not as good as general shallow models. However, if done very deep, a large amount of data is needed for training, otherwise overfitting in machine learning will be inevitable
The application of machine vision technology in the automotive manufacturing industry
Application of machine vision technology in the manufacturing process of automotive engines
In the process of engine manufacturing, machine vision can be used in the following scenarios. On and off the cylinder head, machine vision guides the robotic arm to grab the cylinder head onto or off the Automatic Guided Vehicle (AGV).
Quality inspection of steel seal number printing on cylinder block
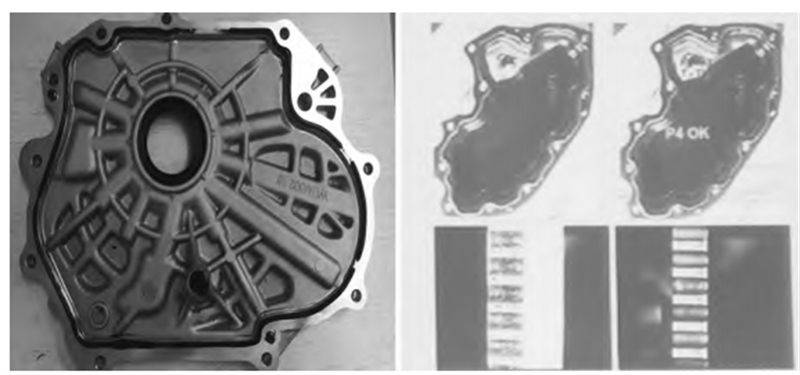
As shown in Figure 1, the main detection principle is to use the OCR character detection function to establish a character library. During detection, character comparison is carried out based on the content of the character library, and the characters are compared with the characters provided by the PLC. When the camera detects that the steel seal number does not match the EUN code in the code block after taking photos, the camera will sound an alarm, and the engine will be driven into the repair fork or repair area. To reduce false alarms during machine vision inspection, the following precautions need to be taken.
a. Using a fixed focus lens to enhance photography stability;
b. "Segmented reading and individual comparison" in camera programs can improve detection accuracy more than "whole reading comparison", and it is recommended to use the former;
c. There are water stains, oil stains, rust, and impurities on the surface of the cylinder seal, which can affect the photographic inspection effect and maintain the cleanliness of the steel seal surface;
d. The reflection and unstable position of the steel stamp number marking head can affect the photo detection effect. The marking head needs to be coated with black to prevent reflection and maintain stable position, or the camera software program can set a delay for taking photos;
e. The stability of the quality of steel stamp characters can affect the effectiveness of photographic detection, and camera software requires continuous training of templates through deep learning.

Figure 1 Machine vision inspection of engine steel stamp number
Missing parts or model inspection
The inspection process involves checking the presence and model of the parts. If there is a missing or incorrect model, the camera will sound an alarm, and the engine, gearbox, etc. to be assembled cannot be released to the next workstation. It is also widely used for the detection of missing and incorrect installation of other automotive components (such as valves, oil seals, flexible discs, cylinder blocks, cylinder heads, camshafts, pistons, etc.). The model recognition of automotive parts can be achieved through three methods: code recognition, character reading, and pattern recognition. Code recognition is mainly divided into barcode, QR code, label code, and DPM code; There are two ways to read characters: OCR and OCV2; Pattern recognition is divided into two types: color and shape.

Figure 2 Machine vision inspection of the presence and model of engine cylinder head valve stem
As shown in Figure 2, the model and presence or absence of detection for the valve stem of the car engine cylinder head are shown. Initially, color coding was used for visual error prevention recognition, but due to the high number of false alarms detected by the camera, it was changed to characters for visual error prevention recognition. It is recommended to use a combination with significant differences in the characters and color codes used for machine vision recognition on automotive parts for error prevention. Character combinations of 1/7, 2/3/5/6, and 8/0 are not recommended, while other character combinations are acceptable; It is recommended to combine color coded components into white/blue, white/red, blue/yellow, and red/yellow combinations. The differences in other combinations are relatively small. When using a camera for visual error prevention, there are more false alarms. On site reference components should be kept consistent with the normal state as much as possible. When there is too much oil in the parts that can easily reflect light, the camera can choose to use a highly penetrating infrared light source.
Photo inspection of adhesive coating quality
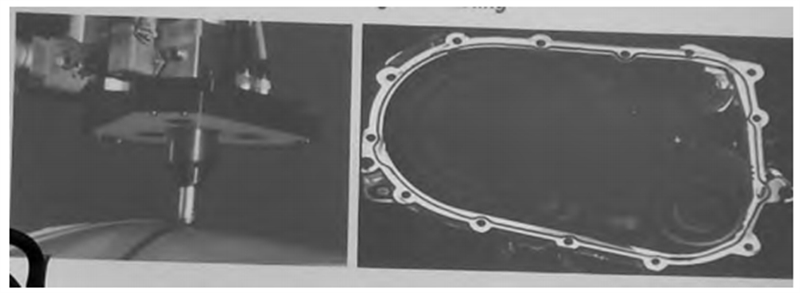
Such as applying glue to the engine oil pan, oil seal, cover, and front cover. The visual inspection error prevention process involves taking photos to detect the glue coating trajectory and broken glue. By detecting the glue line trajectory, the entire trajectory is detected. If any point deviates from the trajectory or breaks glue, the camera alarms and the workpiece cannot flow to the next workstation.

Figure 3 Machine Vision Detection of Glue Coating Trajectory and Glue Breakage on Engine Front Cover
As shown in Figure 3, the camera detects the adhesive coating on the front cover of the engine. When using industrial cameras for glue quality inspection, the unstable glue trajectory and glue quality have an impact on the camera detection effect. For example, when the glue strip in a small area is too short, the start of the glue strip is thick, the end is thin, overlapping, dragging, and the trajectory is poor, the camera detection false alarm rate is high, and the camera parameters need to be adjusted; The glue head is skewed or the cleaning is not clean. The glue trajectory deviates from the camera and has a high false alarm rate. It is necessary to clean and inspect the glue head in a timely manner every shift or when the machine is shut down for a long time; The visual error prevention detection of oil pan coating with black background and black glue uses polarizers to highlight the contour of the adhesive strip more. Visual inspection of grading characters for engine cylinder block and bearing shells.
Detection principle: Use OCR character detection function to establish a character library. During detection, perform character comparison based on the content of the character library, obtain characters, and read QR code information for mutual verification to ensure no errors. In terms of visual inspection technology, the main focus is on the reasonable setting of exposure parameters and template settings in the camera detection program.
Visual inspection of the installation direction comparison between the engine piston and connecting rod cover. The detection principle is to use shape pattern recognition and special comparison with standards, set up your own template, and compare feature points. If there is inconsistency, the camera will take a photo and alarm, and the engine will be driven into a repair fork or loop. In terms of visual inspection technology, the main focus is on the reasonable setting of exposure parameters and template settings in the camera detection program. The engine and gearbox workshops also use 3D cameras for glue detection, rocker arm installation status detection, and robot automatic grabbing. As shown in Figure 9, the 3D camera guides the high-pressure oil pump of the engine to apply glue.

Figure 4 Application of 3D machine vision technology in guiding and following engine gluing
The application of machine vision technology in the manufacturing process of automotive transmissions
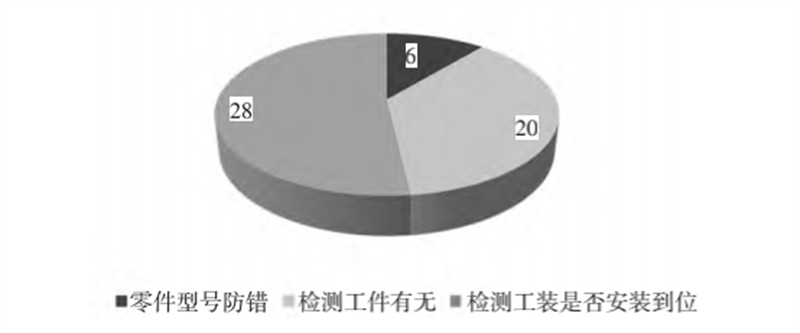
The main application scenarios of machine vision in gearbox manufacturing workshops are defect inspection, error prevention, positioning, measurement, and QR code recognition. Error prevention is the process of comparing and analyzing the characteristics of a workpiece to determine its presence, reverse installation, inadequate installation, or model differences; Positioning is the process of outputting workpiece coordinates through two-dimensional and three-dimensional positioning to guide the machine's motion path; Measurement is the process of testing products to obtain the necessary parameters for quality judgment and process improvement; QR code recognition is the process of reading the product's one-dimensional code and two-dimensional code, obtaining the product model, and conducting traceability. Figure 10 shows the application distribution of over 50 cameras in a certain gearbox assembly workshop, mainly used to detect whether the workpiece is installed properly, whether the workpiece is present, and to prevent model errors. The applications of machine vision positioning include part positioning, material grabbing, and machine path guidance. If the transmission housing assembly and torque converter housing assembly are assembled and assembled, machine vision guides the mechanical arm to grab the transmission housing assembly and torque converter housing assembly onto or off the AGV.

Figure 5 Distribution of application categories of machine vision technology in a certain gearbox workshop
Check the correctness of parts in KIT plates or meal boxes
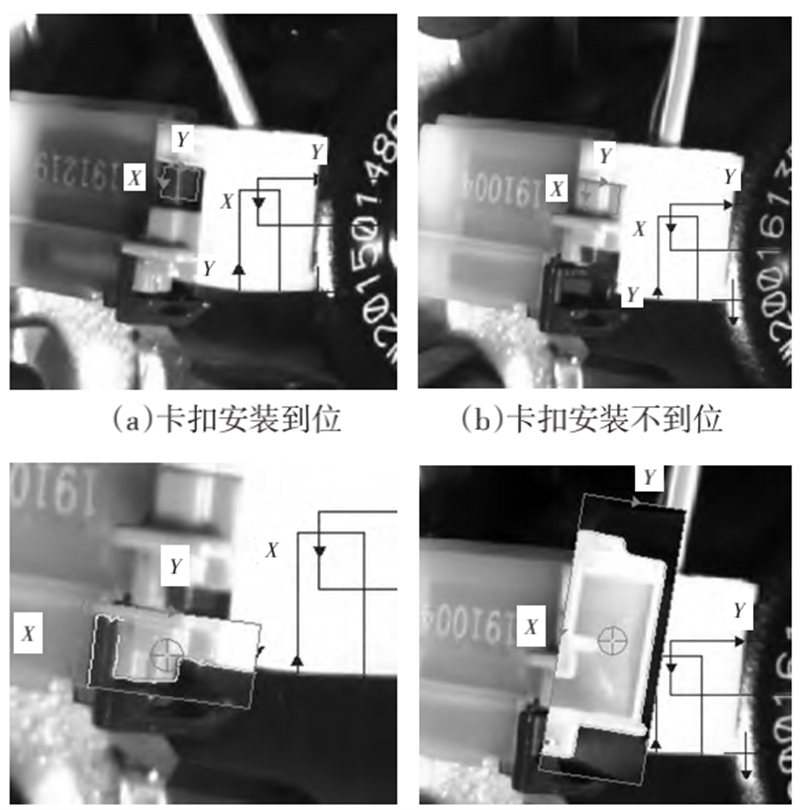
Check if the valve core, spring, cover and other parts of the KIT disk or meal box control valve body and electromagnetic control valve body are present or placed correctly. Compare the photo results with the standard template. If they are not consistent, the camera will sound an alarm, and the KIT disk or meal box cannot flow to the next workstation. Part inspection and measurement, such as determining whether the snap ring is installed properly by measuring the distance between the two holes of the snap ring. Check if the transmission sun gear is present and if the differential model is correct, and if the retaining ring is missing or not installed properly. Check if the electromagnetic valve body harness buckle is missing or not installed properly. As shown in Figure 11, the detection area is based on the color histogram within a fixed range. If the red value of the color histogram for buckles in place and not in place is less than a certain value, it is correct, and if the red value is greater than a certain value, it is not in place. For example, a judgment threshold of 180 is set based on the situation of defective parts that are not in place. If the red score of the histogram detection area is less than 180, it is in place, and if the red score is greater than 180, it is not in place. The judgment threshold needs to be set and verified based on the actual situation of defective parts.

Figure 6 Using machine vision technology to detect whether the gearbox wiring harness buckle is installed in place or missing installation
Check the levelness of electronic valve body pressing. The detection principle is to first establish a pattern model, then locate the pattern, determine the rotation angle, and determine whether it is qualified. If it is unqualified, the camera will alarm, and the workpiece will not flow to the next workstation. CARE station and final inspection station customer characteristics and quality defect detection. Machine vision can be used to prevent errors, such as whether machining holes and threaded holes are missed, whether transmission sealing and pressure testing plugs are missed or installed, and whether the pins of the transmission harness connectors are skewed.

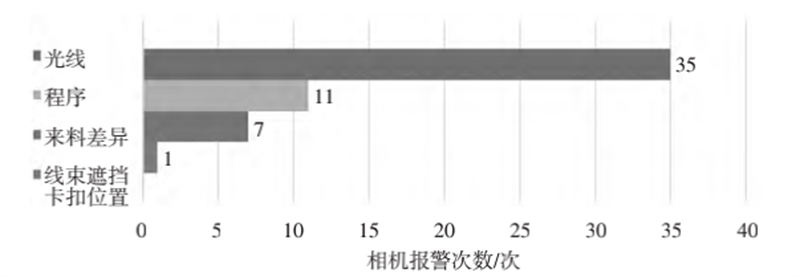
Figure 7 Summary of potential factors affecting camera activation rate
As shown in Figure 7, the distribution of factors affecting the equipment start-up rate caused by camera false alarms within one year during the application of machine vision in a certain workshop. During the image capture stage, the brightness of the light source, image positioning, consistency of the surface quality of the incoming parts, presence of oil on the surface of the parts, exposure level, and focal length all affect the quality of photography, while the camera's field of view affects the imaging range. To address the issue of camera false alarms caused by the program, the main approach is to increase the training sample size and optimize parameters based on the sample data; To address the issue of camera false alarms caused by differences in incoming materials, the main approach is to optimize camera parameters (such as exposure, judgment threshold, etc.); To address the issue of camera false alarms caused by light, the main focus is to add a black box to the workstation where the camera is located to ensure light stability, or consider coloring some of the skylights.
The application of machine vision technology in the manufacturing process of automotive vehicles
Machine vision technology is also widely used in the body, paint, stamping, and final assembly of automotive manufacturing engineering. Mainly used for quality defect detection in automotive manufacturing, such as incorrect, missed, and reversed installation of parts, presence or absence of threaded holes, machining tool lines, cracks, burrs, locking holes, welding quality, etc; 2D and 3D visual measurement can achieve 3D dimension detection of automotive components, assembly dimension detection, measurement, panel detection, vehicle flatness detection, etc; Visual positioning or guidance system, robot 2D positioning system such as automatic screw twisting machine, automatic soldering machine, automatic dispensing machine, robot 3D visual guidance system such as automatic guidance for gluing, component processing, sorting and assembly; Equipment diagnosis, testing, and maintenance; Robot control and CNC machining; Material handling equipment, such as part sorting, palletizing, and unstacking; Equipment motion control, such as autonomous driving, automatic operation, etc; Continuous processing and batch processing, etc.
The application of machine vision technology in the automotive manufacturing industry
Future Development Trends of Machine Vision in Automotive Manufacturing Applications
The development trend of machine vision technology in the future application of the automotive manufacturing industry is as follows.
a. The positioning and grasping of disordered parts in automotive parts;
b. Surface defect detection of automotive parts;
c. Error prevention detection based on deep learning;
d. Intelligent measurement of automotive component dimensions;
e. Intelligent detection based on complex logic and intelligent judgment;
f. Intelligent interconnection technology and autonomous driving, etc.
epilogue
This article summarizes the basic theory of machine vision technology and its analysis and research in the field of automotive manufacturing, summarizes its role and practical problem-solving methods in the application process, and predicts future development trends. The use of machine vision technology can effectively reduce production costs, improve production efficiency, flexibility, and automation in automotive manufacturing, laying a solid foundation for the electrification, networking, intelligence, and sharing development of the automotive manufacturing industry, and promoting higher, faster, better, and more sustainable development of the automotive manufacturing industry.
Copyright Statement
The content of the article is sourced from the New Industrial Network, and some materials are collected online. If there are any issues, please contact us privately for timely correction.
